Introduction
Acknowledgements
We have been extremely lucky in our mentors. Jens cut his teeth in the company of the Smalltalk pioneers: Alan Kay, Dan Ingalls, and the rest of the gang who invented personal computing and object oriented programming in the great days of Xerox PARC. He worked with John Maloney, of the MIT Scratch Team, who developed the Morphic graphics framework that’s still at the heart of Snap!.
The brilliant design of Scratch, from the Lifelong Kindergarten Group at the MIT Media Lab, is crucial to Snap!. Our earlier version, BYOB, was a direct modification of the Scratch source code. Snap! is a complete rewrite, but its code structure and its user interface remain deeply indebted to Scratch. And the Scratch Team, who could have seen us as rivals, have been entirely supportive and welcoming to us.
Brian grew up at the MIT and Stanford Artificial Intelligence Labs, learning from Lisp inventor John McCarthy, Scheme inventors Gerald J. Sussman and Guy Steele, and the authors of the world’s best computer science book, Structure and Interpretation of Computer Programs, Hal Abelson and Gerald J. Sussman with Julie Sussman, among many other heroes of computer science.
In the glory days of the MIT Logo Lab, we used to say, “Logo is Lisp disguised as BASIC.” Now, with its first class procedures, lexical scope, and first class continuations, Snap! is Scheme disguised as Scratch.
We have been fortunate to get to know an amazing group of brilliant middle school(!) and high school students through the Scratch Advanced Topics forum, several of whom have contributed code to Snap!: Kartik Chandra, Nathan Dinsmore, Connor Hudson, and Ian Reynolds. Many more have contributed ideas and alpha-testing bug reports. UC Berkeley students who’ve contributed code include Michael Ball, Achal Dave. Kyle Hotchkiss, Ivan Motyashov, and Yuan Yuan. Contributors of translations are too numerous to list here, but they’re in the “About…” box in Snap! itself.
This work was supported in part by the National Science Foundation grant 1143566, and in part by MioSoft.
Snap! Reference Manual
Version 4.0
Snap! (formerly BYOB) is an extended reimplementation of Scratch (http://scratch.mit.edu) that allows you to Build Your Own Blocks. It also features first class lists, first class procedures, and continuations. These added capabilities make it suitable for a serious introduction to computer science for high school or college students.
To run Snap!, open a browser window and connect to either http://snap.berkeley.edu/run to start with a minimal set of blocks or http://snap.berkeley.edu/init to load a small set of additional blocks (a little slower startup, but recommended for convenience and assumed in this manual).
Blocks, Scripts, and Sprites
This section describes the Snap! features inherited from Scratch; experienced Scratch users can skip to subsection B.
Snap! is a programming language — a notation in which you can tell a computer what you want it to do. Unlike most programming languages, though, Snap! is a visual language; instead of writing a program using the keyboard, the Snap! programmer uses the same drag-and-drop interface familiar to computer users.
Start Snap!. You should see the following arrangement of regions in the window:
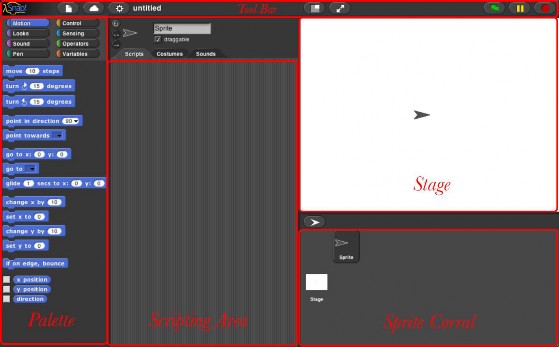
(The proportions of these areas may be different, depending on the size and shape of your browser window.) A Snap! program consists of one or more scripts, each of which is made of blocks. Here’s a typical script:
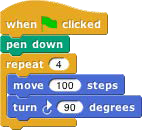
The five blocks that make up this script have three different colors, corresponding to three of the eight palettes in which blocks can be found. The palette area at the left edge of the window shows one palette at a time, chosen with the eight buttons just above the palette area. In this script, the gold blocks are from the Control palette; the green block is from the Pen palette; and the blue blocks are from the Motion palette. A script is assembled by dragging blocks from a palette into the scripting area in the middle part of the window. Blocks snap together (hence the name Snap! for the language) when you drag a block so that its indentation is near the tab of the one above it:
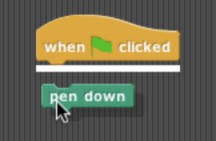
The white horizontal line is a signal that if you let go of the green block it will snap into the tab of the gold one.
Hat Blocks and Command Blocks
At the top of the script is a hat block, which indicates when the script should be carried out. Hat block names typically start with the word “when”; in this example, the script should be run when the green flag near the right end of the Snap! tool bar is clicked. (The Snap! tool bar is part of the Snap! window, not the same as the browser’s or operating system’s menu bar.) A script isn’t required to have a hat block, but if not, then the script will be run only if the user clicks on the script itself. A script can’t have more than one hat block, and the hat block can be used only at the top of the script; its distinctive shape is meant to remind you of that.
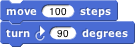
The other blocks in this script are command blocks. Each command block corresponds to an action that Snap! already knows how to carry out. For example, the block
 tells the sprite (the arrowhead shape on the stage at the right end of the window) to move ten steps (a step is a very small unit of distance) in the direction in which the arrowhead is pointing. We’ll see shortly that there can be more than one sprite, and that each sprite has its own scripts. Also, a sprite doesn’t have to look like an arrowhead, but can have any picture as
a costume. The shape of the move block is meant to remind you of a Lego™ brick; a script is a stack of blocks. (The word “block” denotes both the graphical shape on the screen and the procedure, the action, that the block carries out.)
The number 10 in the move block above is called an input to the block. By clicking on the white oval, you can type any number in place of the 10. The sample script on the previous page uses 100 as the input value. We’ll see later that inputs can have non-oval shapes that accept values other than numbers. We’ll also see that you can compute input values, instead of typing a particular value into the oval. A block can have more than one input slot. For example, the glide block located about halfway down the Motion palette has three inputs.
Most command blocks have that brick shape, but some, like the repeat block in the sample script, are C-shaped. Most C-shaped blocks are found in the Control palette. The slot inside the C shape is a special kind of input slot that accepts a script as the input. In the sample script, the repeat block has two inputs: the number 4 and the script